Read up on the compiler changes in the monthly release notes.
This month we’ve got a new podcast from Allen, including Andrew Kelley and Ginger Bill. They talk about language design and a bit about textual programming. This fits nicely with the blog entries for this month.
Karl Zylinski can’t stop with dishing out high quality odin videos. From tutorials to basic games everything get’s covered.
Indiedevs Talk Shop is his podcast, featuring fellow gamedevs and talking about… well anything gamedev related.
Here is one of my favorites so far with the game developer Dennis Gustafsson, one of the creators of Teardown. As a big fan of the game it was nice to hear how the game got started and what was most challenging about development.
Projects shared this month #
| Project Name | Description |
|---|---|
| odin-aseprite | Aseprite File Handler updated |
| opencv-odin-demo | OpenCV bindings |
| locale | Manage locales |
| odin-wasm | Wasm Canvas Context |
| onnx-odin | onnx Bindings |
| podin | collect translatable messages in Odin source to be managed |
| gameinput | Microsoft GameInput Bindings |
| vulkan-triangle | Vulkan GLFW Triangle |
| NML Odin | Neat Matrix Library Port to odin |
| Dusk | Game Framework |
Undo/Redo Implementation #
Jakub has posted a blog on their blog about implementing Undo/Redo systems, give it a read.
https://jakubtomsu.github.io/posts/simple_undo_redo_in_odin/
Text Editor Experimentation #2 (Skytrias) #
Last month I showed off my text editor with a bit of a twist in terms of buffer management. This time around we’ll look into what other approaches exist.
Dion #
Dion was a demo project showed off at around the handmade circles about having an AST (Abstract Syntax Tree) level editor. Sadly the project has been discontinued and the website is now down, but luckily I have saved some of the showcase material. I’ll show one of them as long as the creators are okay with it.
I’m not certain why the project has been dropped. I think it’s sad that nobody is actively developing something like Dion anymore. If you know anybody who still does, let me know!
Getting Started #
I’ve always wanted something like this for odin. We’ll get into the difficulties that may arrise later.
It’s worth mentioning that I’m not a programming language guy. AST’s and everything surrounding it were quite new to me. It took a while to understand how odin’s AST works.
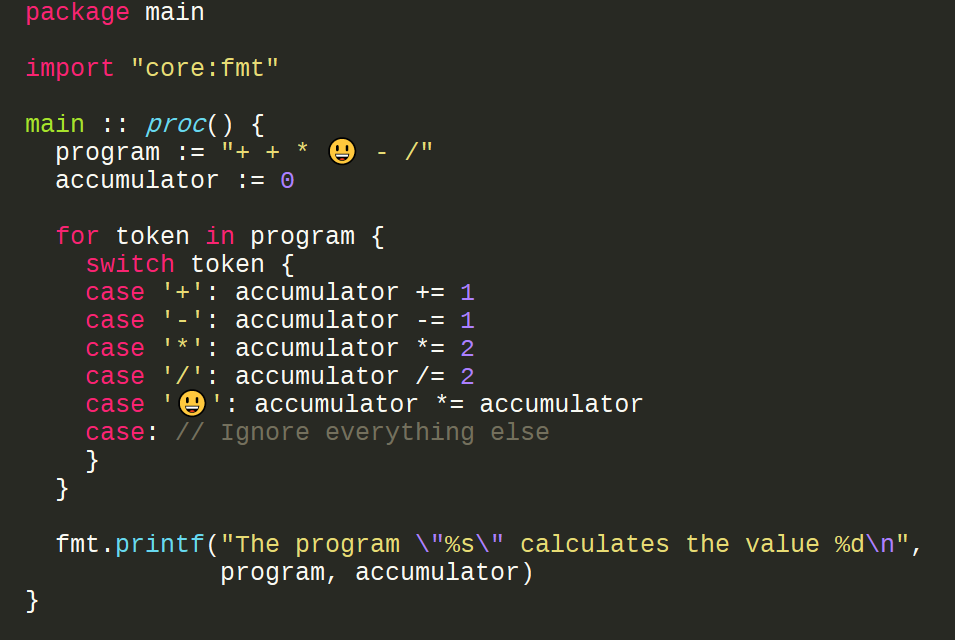
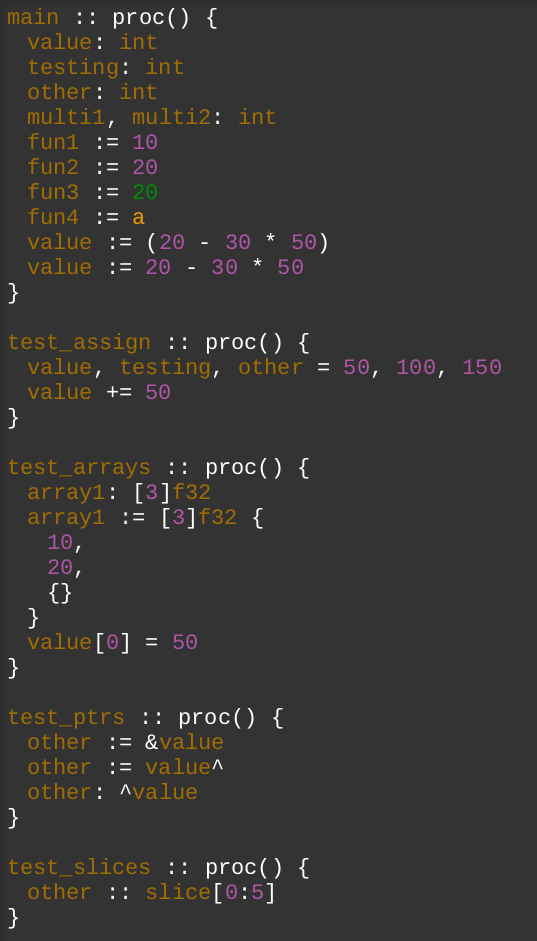
As we already have a nice core:odin/ast / core:odin/parser package, it was easy to get started analyzing the output, of what the raw text would equate to.
AST Structure & Examples #
I won’t go into too much detail but basically odin’s AST is split up into Statements and Expressions. There are also Declarations and Types but which can be thought of subtypes.
So a generic node for odin would look something like this:
Node :: struct {
  // linked list
  prev: ^Node,
  next: ^Node,
  parent: ^Node,
  node_type: Node_Type,

  // sub lists
  names: List,
  values: List,
  params: List,
  // ...

  // sub nodes
  body: ^Node,
  type: ^Node,

  init: ^Node,
  cond: ^Node,
  body: ^Node,
  extra: ^Node,
  // ...

  // properties
}

Node_Type :: enum {
  // ...
}
Let’s try out a simple example first
some_value: int
Equals
Declaration_Value ":"
- NAMES
  - Expression_Identifier "some_value"
- TYPE
  - Expression_Identifier "int"
- VALUES
  - empty
But it could also get more complex
value1, value2, value3: int = 1, 2, 3
Equals
Declaration_Value ":"
- NAMES
  - Expression_Identifier "value1"
  - Expression_Identifier "value2"
  - Expression_Identifier "value3"
- TYPE
  - Expression_Identifier "int"
- VALUES
  - Expression_Basic_Literal (integer) "1"
  - Expression_Basic_Literal (integer) "2"
  - Expression_Basic_Literal (integer) "3"
Let’s try an odin procedure, can you guess how it’s built up?
some_procedure :: proc() {

}
Would turn out to be
Declaration_Value "::"
- NAMES
  - Expression_Identifier "some_procedure"
- VALUES
  - Expression_Procedure_Literal "proc"
    - BODY
      - Statement_Block "{...}"
    - TYPE
      - Type_Procedure "(...)"
        - PARAMS (procedure arguments)
          - ...
          - ...
          - ...
Quite complex just for a procedure, don’t you think?
AST Creation #
First we have to figure out our Node structure and how we’ll layout things. As you can see above my approach was to go very untyped. Nodes would infer what would have to be used just by their node_type.
Once we got that figured out we’ll need ways to manually create the AST to test out all the odin features.
My method was to look what the core:odin/ast would spit out and recreate that tree. I ended up with roughly ~10 test functions which would go through different scenarios.
AST Rendering #
Debug printing won’t get us far and the goal is to render the AST anyway. It sounds complex, but once we figure out how nodes would recursively draw their sub sections it turns out to be simple.
For now we just want to render the AST back to the original textual syntax.
To draw the entire odin AST I ended up with around with roughly 600 loc (excluding rendering logic)!
Here’s a basic example of a block statement { ... } and an identifier node would render their content.
node_ui :: proc(using draw: ^Draw_State, node: ^tree.Node)
  sub: Rect

  switch (node.node_type) {
    // ...

    case .Stmt_Block:
      draw_text_basic_inc(draw, &sub, "{")
      column = 0
      line += 1
      indentation += 1

      // draw children statements
      for s := node.values.head; s != nil; s = s.next {
        node_ui(draw, &sub, s)
        column = 0
        line += 1
      }

      indentation -= 1
      draw_text_basic_inc(draw, &sub, "}")
      column += 1

    // ...

    case .Expr_Ident:
      draw_text_ident_inc(draw, &sub, node.content, node) // node.content is strings.Builder

    // ...
  }
}
Wrapping Up #
Since the short blog is getting quite long already we’ll take a break here and dive into editor navigation, editing and the other painful things that the AST editing ends up becoming.
If you’re interested in AST editing let us know!
codin (markersniffen) #
A few years ago I decided that I was going to figure out how to write cross-platform apps. I was a motion graphics artist by trade, getting frustrated with the limitations and bloat of the software I had access to. My experience was limited to simple scripts in Python (for Blender), writing “expressions” in After Effects (think slower than normal javascript), and a bout in Java (I think?) trying to control robotic cameras. At the beginning I remember trying to write an Adobe Illustrator clone in the browser before my brother (who has an actual CS degree) pointed me to Handmade Hero, which through some series of events led me to Odin. Odin completely changed everything for me - everything seemed to click and I started the slow journey of learning how things a little lower down worked.
UI #
My apps were going to be graphical by nature - as a graphics artist most of what I wanted to do involved them in some capacity. I found Dear Imgui early on and used that during my first serious odin project. I quickly ran into some frustrating limitations, and decided I wanted to write my own UI. My design is based heavily on the fantastic series of blog posts by Ryan Fleury, so reading and digesting some of that is highly recommended.
All of my UI development has been at the service of other projects, and I keep a few “example” projects in the repository to help test a variety of conditions that my library needs to be able to handle. One of these projects is a code editor. Dubbed codin (for obvious reasons), there are several parts of the project that were both fun and interesting for me to figure out. For this post I decided to focus on the way the UI builder code works. When it comes down to it, core of the editor is based on a single widget of my UI library, edit_multiline.
As an imgui, the builder code in my library looks something like this:
{
  panel_begin()
  size(.PARENT, 1, .TEXT, 1)
  if button(buffer.name).clicked do fmt.println("You clicked a button!")
  panel_end()
}
Everything in the UI is composed of a hierarchy of boxes that compose everything displayed in the UI. A widget is a chunk of code the creates and manipulates the boxes. For example, the button() function in the above example looks like this:
button :: proc(name:..any) -> Box_Ops {
  set_hover_cursor(.HAND)
  box := create_box({name, "###Button"}, { .CLICKABLE, .DRAW_TEXT, .HOT_EFFECTS, })
  process_ops(box)
  return box.ops
}
For codin, I created a widget for editing a single line of text:
edit_text :: proc(name: []any, text:^string) -> Box_Ops {
  set_hover_cursor(.IBEAM)
  text_align(.LEFT)
  box := create_box({name, "EditTextBox"}, { .CLICKABLE, .DRAW_TEXT }, text)
  process_ops(box)
  if box.ops.clicked do set_focused(box.key)

  if is_focused(box) {
    // handle keyboard input to edit text string
  }
  ...
}
But in codin we need to edit multiple lines of text, so why don’t we just put that widget into another one:
edit_multiline :: proc(name: []any, lines:^[dynamic]string) -> Box_Ops {
  for line in lines {
    edit_text(name, line)
  }
}
That, as the name suggests, lets you edit a chunk of text that is composed of multiple lines. But what we have more lines than fill the screen? My library has a scrollbox() widget that scales to fit it’s children and adds bars you can grab to slide it up and down:
The problem with this approach is that if you have a large text file, there are potentially hundreds or thousands of lines of text that are offscreen and do not need boxes created for them. That wastes a lot of cycles on invisible content. I adjusted the demo so that you could see the offscreen boxes outlined in blue:
My solution to this problem was to only create boxes for visible lines of text. However, this breaks the scrollbox - the scrollbox needs a full set of children to determine the proper height for it’s own box. What I needed to do was create a spacer box before the visible boxes to account for the offscreen boxes that are no longer created, and also manually calculate the height of the scrollbox, since we don’t have the children boxes that appear after the last visible line:
- First calculate the number of visible rows
- Then calculate what the height of the scrollbox would be if I created boxes for all the rows
- Then create the scrollbox widget, telling it exactly how tall to be in pixels
- Finally calculate which line of text is the first one to draw by looking at the vertical offset of the scrollbox
edit_multiline :: proc(...) {

  visible_rows      := get_panel_height() / get_line_space()
  row_count         := len(lines)
  scrollbox_height  := f32(row_count) * get_line_space()

  size(.PARENT, 1, .PIXELS, scrollbox_height)
  sbox := scrollbox({"text buffer"})

    first_line_index := int(abs(sbox.offset.y) / get_line_space())
    last_line_index  := first_line_index + visible_rows

    // add spacer
    spacer(0, get_line_space() * f32(first_line_index))

    // for each line..
    for li in first_line_index..=last_line_index
      line := &lines[li]
      edit_text(name, line)
    }
  pop()
}
And now we only create and calculate the number of boxes that would be visible:
Now that we are drawing the lines, how do we know which line our cursor is on? We get the cursor position as an input, so let’s compare that to the box indices, and when they are equal we can draw a border around it:
edit_multiline :: proc(..., cursor:^Txt_Pt, ...)
{
  ...

  // for each line..
  for li in first_line_index..=last_line_index
    line := &lines[li]
    txt_box := edit_text(name, line)

    if li == cursor.row {
      txt_box.border = 2
      txt_box.border_color == get_color(.FOCUSED)
    }

  }
}
Now that we highlight the line that cursor is on, let’s look at moving it around. We can move the cursor up and down by checking keyboard input events:
edit_multiline :: proc(...cursor:^Txt_Pt, auto_scroll:^bool ...)
{
  ...

  if os_key_event(.PRESS, .UP,   {}     ) do cursor.row -= 1
  if os_key_event(.PRESS, .UP,   {.CTRL}) do cursor.row -= visible_rows
  if os_key_event(.PRESS, .DOWN, {}     ) do cursor.row += 1
  if os_key_event(.PRESS, .DOWN, {.CTRL}) do cursor.row += visible_rows

  // clamp cursor so it stays in range...
  cursor.row = clamp(cursor.row, 0, len(lines)-1)
}
How about auto scrolling when the cursor is not in the visible range?
- first check if the cursor is in the visible range of boxes
- then set the scrollbox vertical offset to a position that would show the cursor’s row
edit_multiline :: proc(..., cursor:^Txt_Pt, ...)
{
  ...
  cursor_in_range := (cursor.row >= first_line_index) && (cursor.row < last_line_index)
  if !cursor_in_range {
    sbox.offset.y = cursor.row * get_line_space()
  }
}
One thing I realized was that we don’t always want to auto scroll…often I manually scroll around a file and let the cursor go off screen. So I added a scroll_trigger:^bool as an input to give us a way to limit the auto scroll:
edit_multiline :: proc(..., cursor:^Txt_Pt, auto_scroll:^bool ...)
{
  ...
  if auto_scroll^ {
    cursor_in_range := (cursor.row >= first_line_index) && (cursor.row < last_line_index)
    if !cursor_in_range {
      sbox.offset.y = cursor.row * get_line_space()
    }
  }
}
The above code above is a simpler version of codin’s edit_multiline widget that actually exists, but it accurately captures how I implemented the described features. For what it’s worth, the actual edit_multiline fuction definition looks like:
edit_multiline :: proc(
    name:            []any,
    lines:           ^[dynamic]string,
    active:          bool,
    cursor, mark:    ^Text_Pt,
    scroll_trigger:  ^bool,
    bars:            f32=16
  ) -> (Box_Ops, []^Box, []int)
{
  // actual implementation goes here...
}
The inputs:
nameis just a unique identifier for all the boxes in the widget.linesis an array of strings that we can view and edit.cursoris a[2]intthat contain the cursor location.markis another[2]intthat contains a cursor that marks the beginning or end of a text selection.scroll_triggeris aboolthat tells the widget whether or not to auto-scroll to the line that contains the cursor on the screen.barsis a float that indicates the width of the scroll bar.
The return values:
- Box_Ops is a struct that contains any state affected by input, e.g. clicking, hovering, releasing, etc.
- []^Box and []int are temporary arrays of the visible boxes/line indices that I use to highlighting and jump to to build errors.
Build Errors #
As implied by the return vaues above, I added the ability to run a build from within codin, so here’s a breakdown of how that system works and integrates with the UI. I created the concept of a terminal, defined loosely by this struct:
Terminal :: struct {
  panel:          ^ui.Panel,                                // ui panel that the terminal is linked to
  command:         string,                                  // a string to hold the build command (e.g. "odin run ./code --debug")
  vpool:           g.VPool,                                 // pool to hold memory for build error strings
  build_errors:    [dynamic]Build_Error,                    // array of build error structs
  error_list:      map[string]g.Simple_List(Build_Error),   // map of errors by string (file name)
  active_error:   ^Build_Error,                             // currently highlighted error
  build_status:    Build_Status,                            // enum {Nil, Failure, Success}
  build_thread:   ^thread.Thread,                           // build thread
}
A Build_Error looks like this:
Build_Error :: struct {
  prev,next:    ^Build_Error,  // pointers to create linked list
  path:         string,        // path to file that error is in
  file:         ^File,         // pointer to file object that error is in
  message:      string,        // error message
  point:        ui.Text_Pt,    // row & column where error occurs
}
I create a new panel and add an edit_text widget to fill out the terminal.command string:
I make a call via the win32 api to start a process using the previously defined command:
execute_terminal_command :: proc(process_command: string) {
  p := &app.terminal.process
  p.security_attributes.nLength = size_of(windows.SECURITY_ATTRIBUTES)
  p.security_attributes.bInheritHandle = true
  p.security_attributes.lpSecurityDescriptor = nil

  // create pipe
  if !windows.CreatePipe(&p.child_out_read, &p.child_out_write, &p.security_attributes, 0) { ui.print("CreatePipe failed!", windows.GetLastError()) }
  if !windows.CreatePipe(&p.child_in_read, &p.child_in_write, &p.security_attributes, 0) { ui.print("CreatePipe failed!", windows.GetLastError()) }

  if !windows.SetHandleInformation(p.child_out_read, windows.HANDLE_FLAG_INHERIT, 0) { ui.print("Stdout SetHandleInformation") }
  if !windows.SetHandleInformation(p.child_in_write, windows.HANDLE_FLAG_INHERIT, 0) { ui.print("Stdout SetHandleInformation") }

  si: windows.STARTUPINFOW
  si.cb = size_of(si)
  si.hStdError  = p.child_out_write
  si.hStdOutput = p.child_out_write
  si.hStdInput  = p.child_in_read
  si.dwFlags += windows.STARTF_USESTDHANDLES

   // Start the child process.
  pcommand := windows.utf8_to_utf16(process_command)
  pdir     := windows.utf8_to_utf16(app.project.path)

  if(!windows.CreateProcessW(nil, &pcommand[0], nil, nil, true, windows.CREATE_SUSPENDED|windows.CREATE_NO_WINDOW, nil, &pdir[0], &si, &p.process_info)) {
    ui.print("CreateProcess failed!", windows.GetLastError())
    return
  }

  windows.ResumeThread(p.process_info.hThread);
  windows.CloseHandle( p.child_out_write )
  windows.CloseHandle( p.child_in_read )

  if app.terminal.build_thread != nil do  thread.terminate(app.terminal.build_thread, 0)
  app.terminal.build_thread = thread.create_and_start_with_data(&app, terminal_read)
}
…and then start a new thread to read from the pipe and fill out an array of Build Errors.
terminal_read :: proc(data:rawptr) {
  a := (^App)(data)
  t := &a.terminal
  p := &a.terminal.process

  BUFSIZE :: 4096
  read:    windows.DWORD
  written: windows.DWORD
  buf: [BUFSIZE]byte
  success: bool

  g.vp_clear(&t.vpool)     // clear memory/array/list for each build
  clear(&t.build_errors)
  clear(&t.error_list)

  // read from pipe
  for {
    success = bool(windows.ReadFile(p.child_out_read, &buf, BUFSIZE, &read, nil))
    if !success || read == 0 do break
    chunk_buffer := g.vp_alloc(&t.vpool, int(read))
    copy(chunk_buffer, buf[:])
    chunk := string(chunk_buffer)
    start: int
    // split into lines
    for letter, li in chunk {
      if letter == '\n' {
        // parse errors into Build_Errors
        parse_build_error(t, chunk[start:li])
        start = li + 1
      }
    }
  }

  if len(t.build_errors) == 0 {
    t.build_status = .Success
    t.active_error = nil
    return
  }

  t.build_status = .Failure
  set_active_error(&t.build_errors[0])
}
Back on the UI side, there are two jobs to do - first is to draw a list of build errors. In the new terminal panel, I add a scrollbox widget and then draw each error inside of clickable buttons:
terminal_panel :: proc() {
  panel_begin()

  size(.PARENT, 1, .CHILDREN, 1)
  scrollbox("errors")
  {
    pi: int
    // iterate through map of file paths
    for path in terminal.error_list {
      ei: int
      // advance through linked list of errors
      for e := terminal.e_list[path].first; e != nil; e = e.next {

        axis(.X)
        size(.PARENT, 1, .TEXT, 1)
        error_box := create_box({"error button", pi, ei}, { .FOCUS, .CLICKABLE, .HOT_EFFECTS, .ACTIVE_EFFECTS })

        // if error box clicked, set active error:
        process_ops(error_box)
        if error_box.ops.clicked do set_active_error(e)

        // highlight button if active error
        if e == terminal.active_error do error_box.flags += {.DRAW_BG, .DRAW_BORDER, .DRAW_GRADIENT }

        push_parent(error_box)
          // display an icon, row/col numbers, error filepath, and the error message itself:
          size(.TEXT, 1, .TEXT, 1)
          icon(ICON_CIRCLE, "###", ei, pi)
          set_font(.Mono)
          size(.PARENT, .1, .PARENT, 1)
          text("Row ", e.point.row, " Col ", e.point.col, "###", ei, pi)
          size(.PARENT, .2, .PARENT, 1)
          text(e.path, "###", ei, pi)
          size(.MIN_SIBLINGS, .1, .PARENT, 1)
          text(e.message, "###", ei, pi)
        pop()
        ei += 1
      }
      pi += 1
    }
  }
  panel_end()
}
The last step is to look back at the edit_multiline widget and highlight any visible rows that contain build errors. The full widget returns a list of visible boxes and row indices, so I used those like this:
buffer_panel :: proc() {
  begin_panel()

  text_buffer := get_buffer_by_panel(get_ctx_panel())

  // draw text buffer via the edit_multiline widget
  ops, visible_boxes, visible_rows := edit_multiline(...)

  // get error list by the buffer's file's path:
  error_list, lok := app.terminal.error_list[text_buffer.file.path]

  // for each visible row:
  for row, ri in visible_rows {
    // for each build error in linked list
    for e := error_list.first; e != nil; e = e.next {

      // if this visible row matches an error's row...
      if row == e.point.row {
        // get the visible box
        box := visible_boxes[ri]

        if terminal.active_error == e {
          // highlight visible box one color if it has the selected error
          box.border_color = get_color(.ERROR)
        } else {
          // and a less harsh color if has a non selected error
          box.border_color = get_color(.WARNING)
        }
      }
    }
  }
  end_panel()
}
Conclusion #
What I’ve described is just a snippet of what goes on beneath the hood of codin. Hopefully that shed some light on my process and how a few aspects of both codin and my UI library work.
Sectr Prototype #
After my last contract in January, I wanted a break from C/C++ projects, so I decided to attempt another go at developing a pragmatic “projectional” editor for code using Odin. The goal is to offer support for multiple “workspaces” where users can compose “views” of code definitions in a flexible manner, irrespective of their composition in the filesystem.
Why Odin #
Tired of the C++ toolchain, I chose Odin over Zig. Jai seemed to be up my alley, but I didn’t have the patience to wait for it. Odin’s design looked to impose less friction than Zig so it won out.
That ended up being a great decision. Odin feels better than just being a “C alternative”. Language features, like the “using” keyword and “deferred_” attributes, have been particularly enjoyable to use. Both the provided packages and those sourced from third parties have been easy to learn and integrate.
Exploring the compiler implementation has also been an unexpected bonus. Most toolchains’ source feel too daunting to learn how “a toolchain works”. Odin is the exact opposite. Each file is clear and understandable at a scrolling glance, which is an amazing achievement.
Bootstrapping #
The codebase setup was smooth. The first sign of things to come was how simple and quickly the compiler built after cloning. Making the build script for the project was also surprisingly painless. I was able to get all the info quickly from the build -help command along with reading the flag entries in the src/main.cpp.
Raylib was chosen to handle input, rendering (Text and 2D), and windowing, which did the job initially. Hot-reload was up next. Karl Zylinski’s highly praised article was loosely referenced, along with related content from the Handmade Hero series. Unfortunately, that very series exposed me to Casey’s janky replay feature (abusing memory snapshots), and I wanted to port the feature over to this project.
The first issue was the core library not exposing the starting address arg for VirtualAlloc in core:mem/virtual. However, a derivative of the virtual arena with the argument exposed was easy to implement. Another issue was allocator procedures not getting auto-remapped across reloads, leading to rolling my own dynamic array and hash table. Later, I realized the builtin containers could have been transmuted to their “Raw” struct counterparts (Raw_Map and Raw_Dynamic_Array in base:runtime/core.odin).
The profiler was added last, and I went with Spall since it was directly available in the Vendor library, its simplest profiler I’ve ever used! I’ve never pulled together this many libraries in such a short period of time (in C or C++), even while messing around.
Why an IMGUI from scratch? #
The aim was to have an uncompromised ability to compose a UI tailored to this editor. Inspired by Ryan Fleury’s UI Series on substack, I set out to implement a “core” UI that could support all that was required. I browsed through his implementation from the RAD Debugger, and some others (VUI, Nuklear, and MicroUI). This provided (probably misguided) confidence to tackle the endeavor. So far it’s at least been a great learning experience.
The result was a core UI that’s surprisingly simple for its ability, along with full “flex-box” auto-layout using less than 1000 LOC. It reached a point where composing any “widgets” using just the composition of the core “box” entities felt achievable. Including all the UI code demonstrated (excluding rendering) amounts to approximately 2250 LOC.
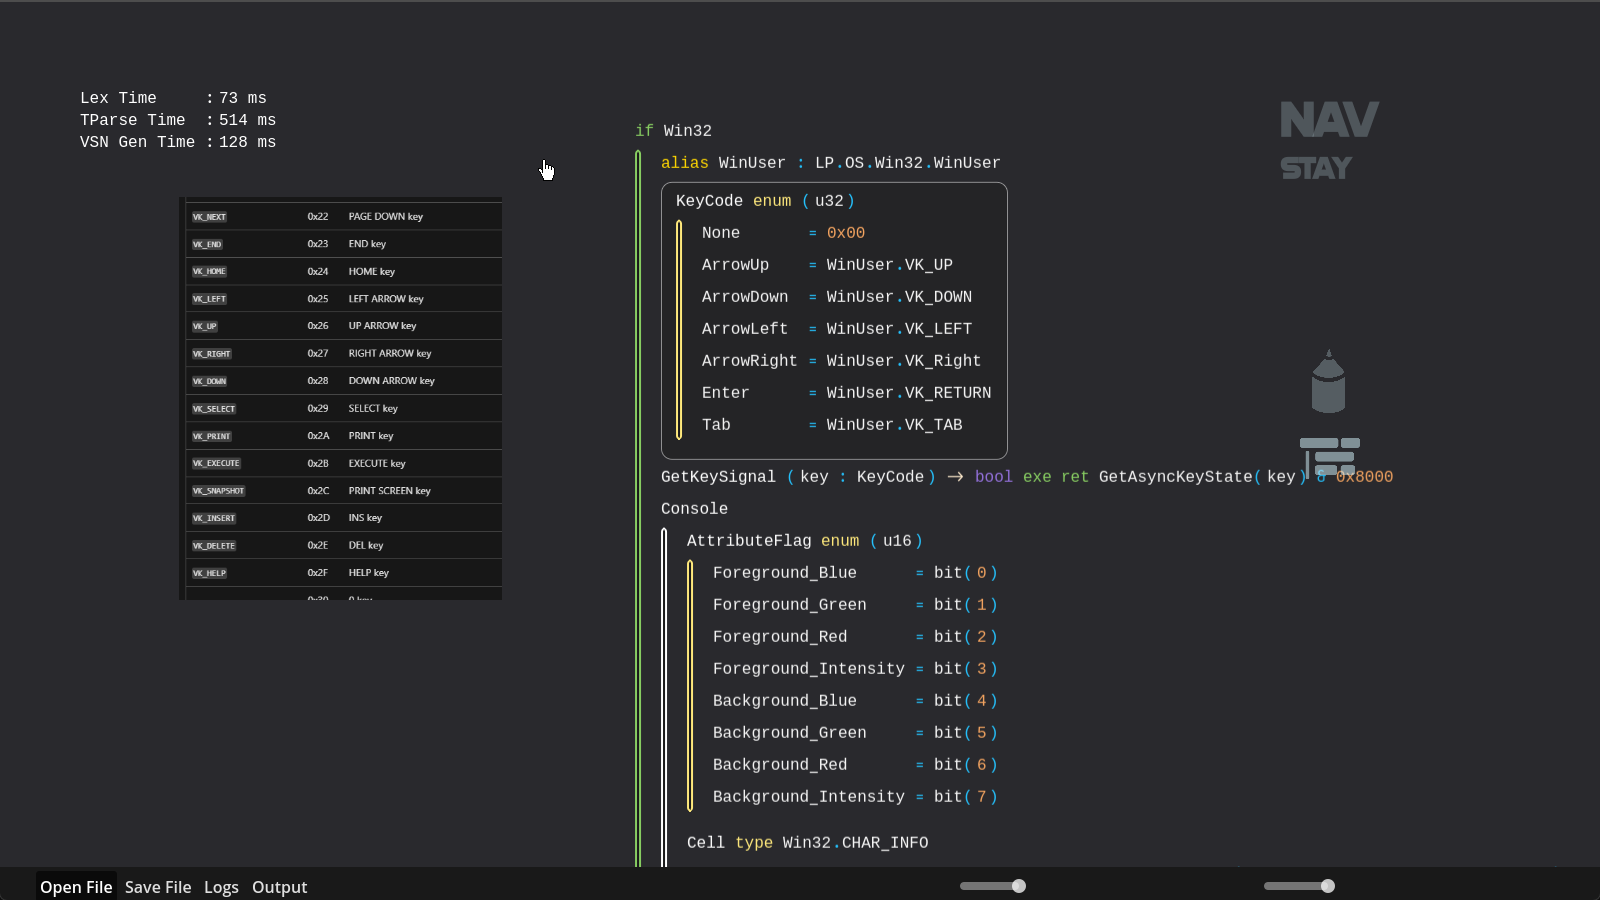
Current Hurdle: Learning Sokol and Text Rendering #
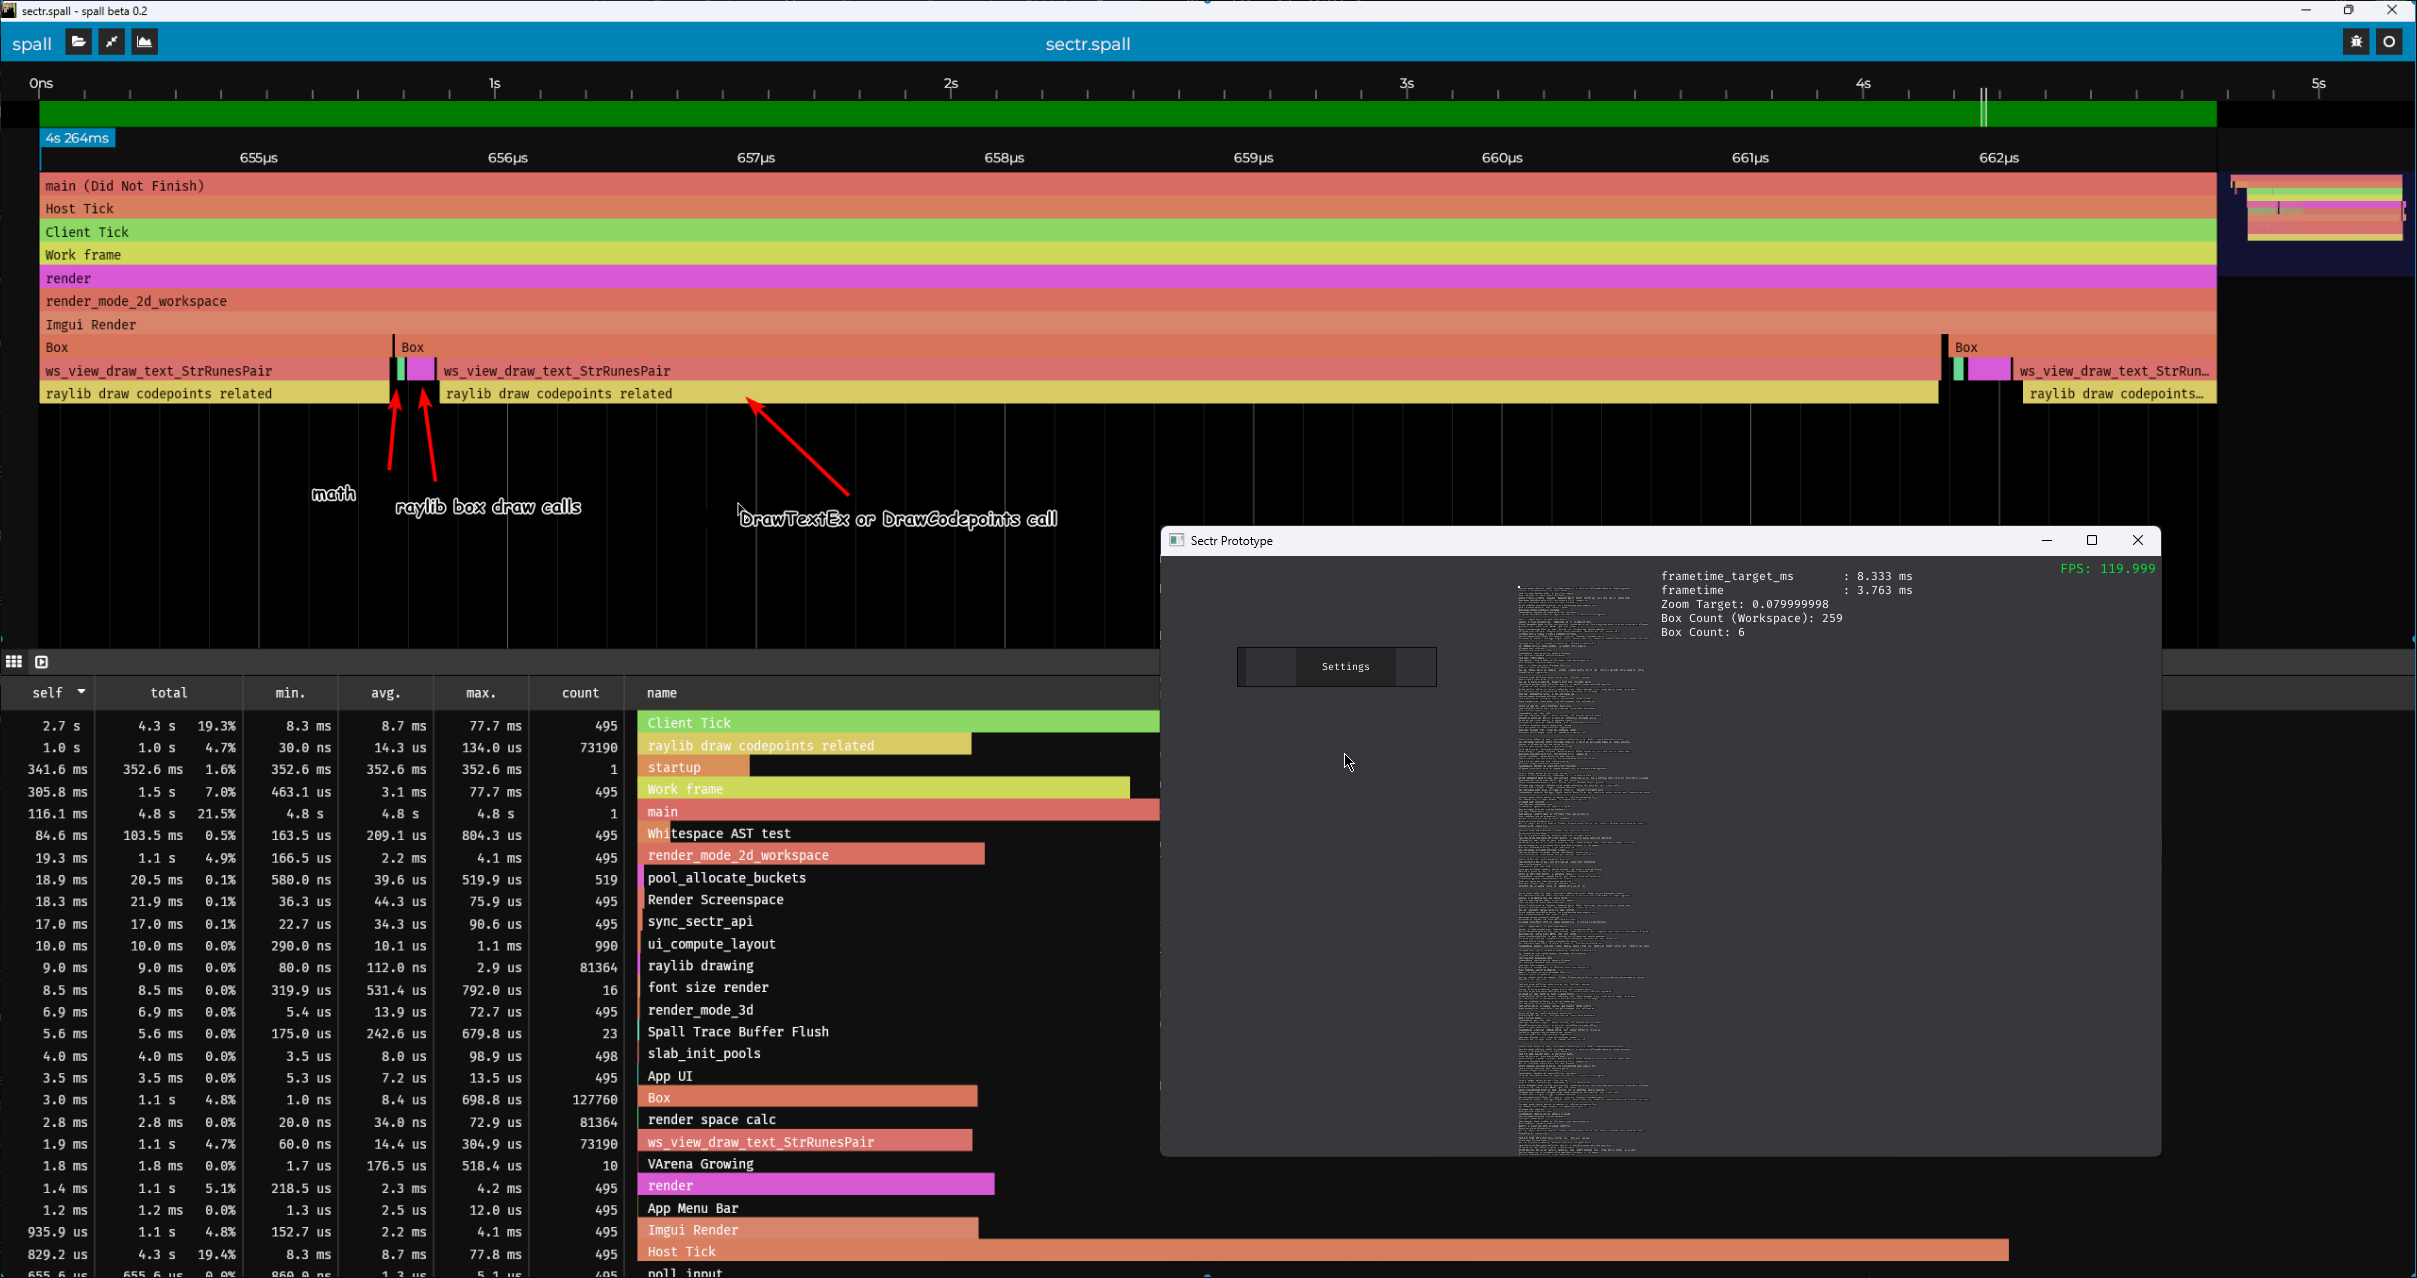
Just having ~250 lines of text boxes queued for rendering would increase the frame time by several milliseconds. Technically, this could be ignored for several months while focusing on other features. However, I wanted to just get the platform and rendering layers down pat. Among the options, Sokol’s app and gfx libraries seemed to be a great fit.There was an available 2D graphics library called Sokol GP as well. All that was left was to determine the best reference for text rendering, and the Discord community recommended fontstash as it had a setup defined for Sokol_gfx in the Sokol repo itself. Since then, I’ve been navigating my way through learning all these new libraries.